
Last updated 2026-07-11
TL;DR
A concrete cold plunge tub costs roughly $500 to $2,000 in materials depending on size, chilling method, and finish. The build takes one to three weekends of labor plus about five weeks of cure time. You need basic concrete skills, a waterproof membrane or pool-grade paint, and a way to hold water at 50 to 59°F.
Is a DIY concrete cold plunge tub actually worth building?
Yes, for the right person. A pre-built cold plunge from a reputable brand runs $1,500 to $8,000 or more. A concrete build you do yourself can land under $1,000 if you keep it simple and already own basic tools. The trade-off is real: time, physical labor, and a learning curve on waterproofing.
Where concrete wins is permanence and customization. You can pour any shape, any depth, any seat ledge you want. Concrete also holds temperature better than thin acrylic shells once the mass is chilled down, because thermal mass works in your favor. A 1,000-pound concrete shell soaks up cold and releases it slowly.
Where concrete loses is effort. A serious waterproofing failure means draining, grinding, recoating, and waiting another week for cure. Acrylic and fiberglass tubs don't have that failure mode. So go in with eyes open. This is a small construction project, not an afternoon craft.
If you want to compare the experience of a concrete plunge against a commercial unit before committing the labor, read our overview of cold plunge options first.
What does a concrete cold plunge tub cost to build?
Material costs vary more than most DIY guides admit, so here is a realistic breakdown by category.
| Category | Budget option | Mid-range | Upgraded |
|---|---|---|---|
| Concrete (bags or ready-mix) | $80, $150 | $150, $300 | $300+ (fiber-reinforced) |
| Form materials (plywood, foam board) | $50, $120 | $100, $200 | $150, $250 |
| Waterproof membrane or pool paint | $80, $200 | $200, $400 | $400, $700 (crystalline or rubber) |
| Drain, fittings, plumbing | $40, $100 | $80, $180 | $150, $300 |
| Chiller or ice budget (first year) | $0 (ice) | $400, $900 (used chiller) | $800, $2,000 (new chiller) |
| Rebar or wire mesh | $30, $80 | $60, $120 | $80, $150 |
| Finish (tile, plaster, or paint) | $0, $100 | $100, $300 | $300, $800 |
| Estimated total | $280, $750 | $1,090, $2,400 | $2,180, $4,200 |
Most first-time builders land in the $800 to $1,500 range once you add the small forgotten items: mixing paddles, release agent, brushes, sandpaper, a pump if you want circulation. Budget for overages. Concrete projects almost always cost 15 to 20 percent more than the first estimate.
Ready-mix delivered by truck is usually cheaper per cubic foot than bags once you exceed about 30 bags (roughly 1.5 cubic yards). For a plunge sized 4 feet long by 3 feet wide by 3 feet deep with 4-inch walls, you need roughly 0.6 to 0.8 cubic yards of concrete, so bag concrete is fine. [1]
What size and shape should you design your cold plunge tub?
The most functional cold plunge for one person is 48 to 60 inches long, 24 to 30 inches wide, and 36 to 42 inches deep. That gives you neck-deep immersion when seated with your knees bent. Shallower than 30 inches and you're soaking your legs but not your core and neck, which matters for the physiological response.
Depth is the dimension most people underestimate. You want water up to your collarbone. A 36-inch interior depth with a seat ledge at about 18 inches lets you sit higher if you're new to cold and want chest-level immersion, then drop lower as you adapt.
Wall thickness of 3.5 to 4 inches is standard for a structure this size. Thinner walls risk cracking under soil pressure if you're going in-ground. Thicker than 5 inches adds weight without structural benefit at this scale.
For shape, a simple rectangle is the easiest form to build. Curves require bending flexible foam board or using sandbags to shape the interior, which is doable but adds complexity. Save curves for your second build.
If you plan an outdoor install, check local setback requirements with your municipality before digging. Many jurisdictions treat an in-ground structure holding water the same as a swimming pool for permit and barrier purposes. [2]
| Recirculating chiller | $650 |
| Waterproof membrane | $300 |
| Finish (tile or plaster) | $200 |
| Concrete (bags) | $200 |
| Plumbing fittings | $130 |
| Formwork (plywood) | $150 |
| Rebar and chairs | $90 |
Source: Portland Cement Association, Laticrete, CPSC pricing data (2024 estimates)
What materials do you need before you start?
Here is the full material list for a standard 4x2.5x3-foot interior tub with 4-inch concrete walls.
Structural materials:
- 60-lb bags of 4,000 PSI concrete mix (about 20 to 24 bags) or equivalent ready-mix
- #3 or #4 rebar cut to fit, or welded wire mesh (6x6 W2.9)
- Plastic rebar chairs or small stones to keep rebar centered in the pour
Formwork:
- 3/4-inch plywood for outer form
- 1/2-inch foam board or additional plywood for inner form
- Form release oil or cooking spray
- Screws, clamps, or ratchet straps to hold forms under pour pressure
Plumbing:
- 1.5-inch or 2-inch PVC drain (set before pour)
- Ball valve for drain control
- Overflow fitting set 2 inches below the rim
- Optional: 1.5-inch inlet for return line if running a chiller
Waterproofing (pick one system):
- Crystalline waterproofing additive (mixed into concrete) plus a surface-applied slurry coat [3]
- Two-part epoxy pool paint (Rust-Oleum EpoxyShield or similar)
- EPDM rubber liner sheet (simplest but changes the aesthetic)
- Cementitious flexible membrane (Laticrete Hydro Ban or similar)
Tools you need:
- Concrete mixer or drill with paddle mixer
- Float and trowel
- Level
- Wire cutters for rebar
- Safety glasses, gloves, N95 mask for dry concrete dust
Don't skip the rebar chairs. Rebar resting on the form bottom ends up with zero concrete cover, which leads to rust and eventual cracking. Aim for 1.5 inches of cover on all sides.
How do you actually build and pour a concrete cold plunge tub?
This is a three-phase project: form building, then the pour, then waterproofing. Each phase has a mandatory wait time you cannot rush.
Phase 1: Build the formwork (half a day)
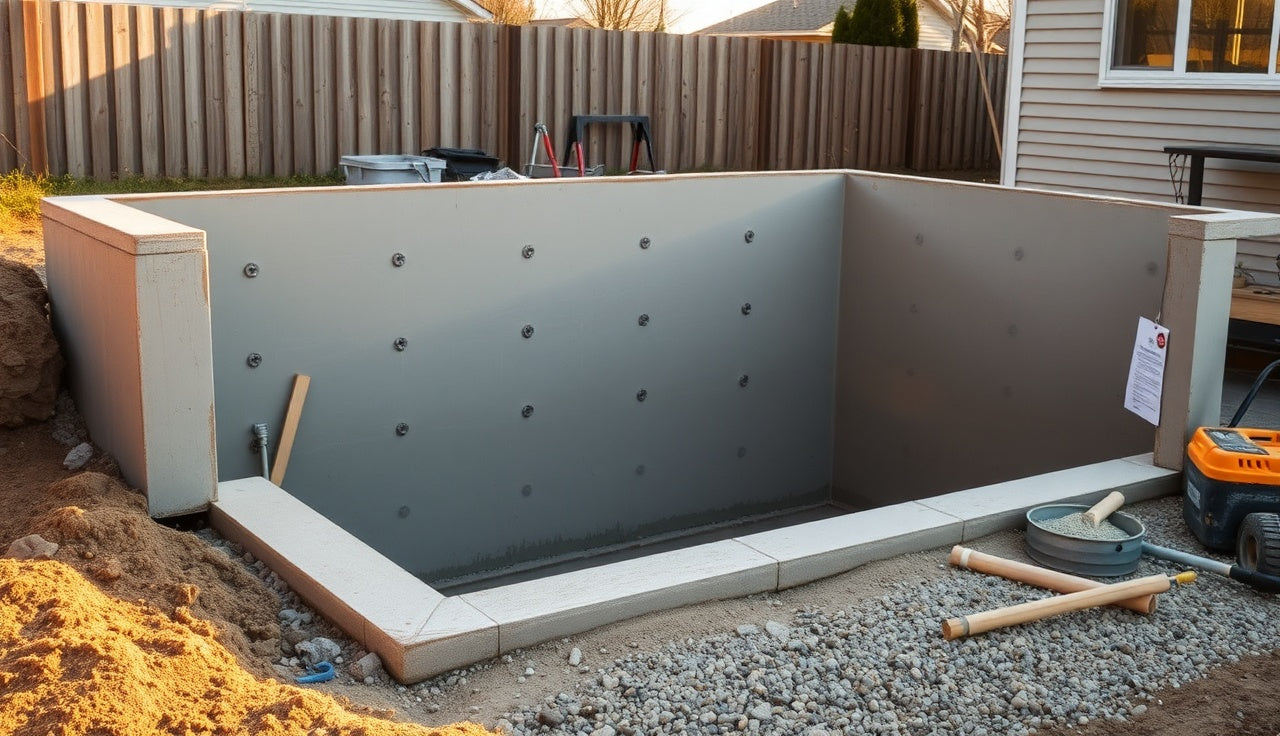
Build your outer form box first from 3/4-inch plywood. This defines the outside of your tub. Then build the inner form, which defines the interior cavity. The gap between outer and inner form is your wall thickness, 4 inches on all sides.
Coat both sides of all form surfaces facing concrete with form release. This is not optional. Concrete bonds aggressively to raw wood. Without release, you will damage the concrete pulling forms off.
Set your drain PVC through the bottom form before any concrete goes in. Use a rubber gasket and flange around the PVC so the concrete pours tight to it. Get the drain perfectly level, because you can't move it after the pour.
Tie rebar into a simple grid inside the wall cavity, 6 to 8 inches on center. Use rebar chairs to hold it centered. Run a perimeter loop around the bottom slab too.
Phase 2: The pour (one day)
Pour the bottom slab first, about 4 inches thick. Rod it or use a concrete vibrator to eliminate air pockets. Let it set for 30 to 45 minutes until it holds a footprint but still has surface moisture, then set your inner form on top (rest it on the green slab). This creates the bond between the floor and wall pours.
Pour the walls in lifts of 12 inches or less. Tamp or rod after each lift. Concrete flowing around rebar in a narrow 4-inch cavity needs help, so take your time. A concrete vibrator wand makes a real difference here and can be rented for about $30 to $50 a day. [4]
Strike the top surface smooth with a screed board and finish with a float. Keep the surface slightly rough if you plan to tile or apply a membrane, or finish it smoother if you plan to paint directly.
Cover with plastic sheeting and mist with water twice a day for at least 7 days. This is curing, not drying. Concrete that dries fast is weak concrete. Give it a minimum of 28 days to reach full design strength of 4,000 PSI. [1]
Phase 3: Strip forms and waterproof (spread across two weeks)
Strip the outer forms after 24 to 48 hours. Strip the inner form carefully after 72 hours minimum. Inspect all surfaces for honeycombing (voids where concrete didn't fill around rebar). Fill voids immediately with a non-shrink patching mortar.
Wait the full 28-day cure before applying any waterproofing system. Applying membrane to green concrete traps moisture and causes delamination.
For crystalline systems: apply two coats of Xypex or similar crystalline slurry at the manufacturer's specified rate, keep damp for 72 hours between coats. Crystalline chemistry actually grows into the concrete matrix and self-heals minor cracks over time. [3]
For epoxy paint: sand the surface lightly, apply a penetrating concrete sealer first, then two coats of pool-grade epoxy paint 24 hours apart. Fill with water for a 48-hour leak test before calling it done.
How do you waterproof a concrete cold plunge tub so it doesn't leak?
This is the single step most DIY builds get wrong. Concrete is porous by default. A mix with a low water-to-cement ratio (0.45 or lower) is much less porous than a wet soupy mix, so use only as much water as the bag instructions specify. Never add extra water to make mixing easier, even though it's tempting.
The three waterproofing systems most used for DIY cold plunges:
Crystalline waterproofing (Xypex, Penetron, or generic crystalline additive): mixed into the concrete or applied as a slurry coat after curing. The chemistry reacts with moisture and calcium silicate to fill capillary pores permanently. Laticrete describes the crystalline reaction as becoming "permanent and integral to the concrete matrix." This is the most durable system for something in constant contact with water. Cost: $80 to $200 for a tub this size. [3]
Cementitious flexible membrane (Laticrete Hydro Ban, Mapei Mapelastic): brush-applied in two coats, flexible enough to bridge hairline cracks. Good for tubs with a tile finish on top because tile adhesive bonds well to it. Cost: $100 to $250.
Epoxy pool paint: cheapest and simplest, but it is a surface coating rather than a penetrating treatment. It can peel if moisture vapor pushes out from inside the concrete. Works well if you let the concrete cure fully and apply a penetrating sealer first. Needs recoating every 3 to 5 years. [5]
Do not use standard latex exterior paint and call it waterproofed. It is not.
For a cold plunge specifically, note that repeated freeze-thaw cycles if you live somewhere that gets below freezing will stress any surface coating. Crystalline or rubber membrane holds up better in freeze-thaw than epoxy paint alone. In cold climates, consider building indoors or adding insulation to the exterior walls.
How do you keep the water cold without spending a fortune on ice?
Ice works for getting started. A 4x2.5x3-foot tub holds about 120 to 150 gallons of water. Dropping that from 60°F to 50°F takes roughly 30 to 40 pounds of ice depending on starting temperature and ambient air temp. At $2 to $4 per 20-pound bag, that's $3 to $8 per session, or $90 to $240 per month if you plunge daily. [6]
That math gets old fast. Most people who build a permanent concrete plunge move to a recirculating chiller within a few months.
A dedicated cold plunge chiller runs water through a refrigerant circuit and returns it cold. Units sized for 100 to 200 gallons from brands like Penguin Chillers or Active Aqua cost $400 to $900 new, or $200 to $500 used. They hold water at a set temperature (usually 39 to 60°F is the usable range for cold therapy) without daily attention. You do need 110V power nearby and a way to run inlet and return lines through or over your tub wall.
A chest freezer conversion is a popular middle ground. A standard 7-cubic-foot chest freezer ($150 to $250 used) holds far less than a full concrete tub. What some builders do is run a submersible pump from the concrete tub through the chest freezer's ice bath and back, using the freezer as a heat exchanger. This works but requires careful insulation of the lines.
The target temperature range for cold water immersion supported by most research is 50 to 59°F (10 to 15°C). A 2022 meta-analysis in PLOS ONE noted that most cold water immersion studies used temperatures in that band for durations of 10 to 15 minutes. [7]
For cold plunge temperature science and how it compares to other recovery methods, our cold plunge benefits overview covers the current research.
How long does the whole build take from start to first plunge?
The physical labor takes two to three weekends of real work. The waiting takes about five weeks because of concrete cure time. Here is the realistic timeline:
- Day 1 (Weekend 1): Build forms, set plumbing, pour concrete.
- Days 2 to 7: Curing. Mist the concrete twice a day. Do not strip inner forms yet.
- Day 3: Strip outer forms only.
- Day 4: Strip inner forms carefully.
- Days 7 to 28: Continue curing under plastic. This is mostly waiting.
- Day 28: Apply waterproofing system.
- Days 29 to 35: Cure waterproofing per manufacturer spec (crystalline needs moisture-curing, epoxy needs dry cure).
- Day 35 to 36 (Weekend 3 or 4): Leak test. Fill with water, mark the level, wait 48 hours. If level drops more than 0.5 inch, find the seam and reapply membrane.
- Day 37+: Fill, chill, plunge.
Total elapsed time: five to six weeks from pour to first use. Plan the project start date accordingly. Starting in early fall if you live somewhere cold is smart because the concrete cures better in moderate temperatures (ideally 50 to 90°F ambient). Pouring in freezing temperatures without heating the mix and protecting from frost is a recipe for weak concrete. [1]
What are the most common mistakes in DIY concrete cold plunge builds?
These are the failures that show up most often, based on what goes wrong in concrete pool and spa construction generally.
1. Too much water in the mix. Every extra cup of water above the specified ratio creates capillary pores that let water migrate. The mix should look like thick oatmeal, not soup.
2. Not waiting for full cure before waterproofing. Applying epoxy paint at day 10 instead of day 28 traps moisture that eventually pushes the coating off. You'll see blistering in patches within a year.
3. Skipping the leak test. Always do a 48-hour static water test before installing a chiller or declaring victory. A hairline crack at a rebar tie is invisible until it's wet.
4. No overflow drain. Without an overflow, a chiller leak or rain event overfills the tub. Set an overflow fitting 2 inches below the top rim during the pour, not after.
5. Installing plumbing fittings through cured concrete. Cutting through cured concrete for fittings you forgot during the pour is possible with a core drill but tedious and expensive. Set all penetrations in the form before pouring.
6. Not accounting for the total weight. A 4x2.5x3-foot concrete tub weighs roughly 1,500 to 2,000 pounds empty, plus 1,000 pounds of water when full. On a wood deck, you need to verify the structure can take that load. Most residential decks are designed for 40 to 60 PSF live load; a concrete plunge concentrates weight far beyond that. [8] Build on a concrete pad or a heavily reinforced structure.
7. No plan for draining and cleaning. Concrete plunges in heavy use can grow biofilm fast. Design in a full-drain ball valve at the lowest point and buy a UV sanitizer or ozone system to reduce how often you need to drain and scrub.
Do you need a permit to build an outdoor concrete cold plunge?
Probably, if it's in-ground or holds more than a certain volume, but the answer depends on your jurisdiction.
Most U.S. states follow model codes that treat any in-ground structure holding water as a pool or spa for permitting purposes once it exceeds a certain depth, commonly 18 to 24 inches. The International Swimming Pool and Spa Code (ISPSC), which many states and municipalities have adopted, defines a spa as a hydro massage pool or tub for recreational bathing, and most cold plunges fall under that definition. [2]
Key permit triggers to check locally:
- In-ground vs. above-ground (above-ground structures get different treatment in many codes)
- Total water volume (some jurisdictions exempt containers under 500 gallons)
- Whether you have a heater or chiller attached (equipment adds a mechanical permit requirement in many cities)
- Fence and barrier requirements: most pool codes require a 48-inch fence with self-latching gates around any in-ground water feature once it exceeds 18 to 24 inches deep [9]
Calling your local building department before you dig costs nothing and can save a demolition order later. In many areas you can pull a simple spa or plunge pool permit for $100 to $300 and a basic site plan drawing.
If you're building indoors in a basement or utility room, the structure itself may not need a permit, but the electrical and plumbing connections to the chiller will likely require permits in most jurisdictions.
How does a DIY concrete plunge compare to a commercial cold plunge tub?
There is no one right answer here. It depends on what you value most.
| Factor | DIY concrete | Commercial cold plunge |
|---|---|---|
| Upfront cost | $500, $2,000 | $1,500, $8,000+ |
| Time to first plunge | 5 to 6 weeks | 1 to 2 days after delivery |
| Customization | Full control | Limited to model options |
| Maintenance | Manual or DIY sanitation | Some units have built-in filtration |
| Portability | Zero (it's concrete) | Most are movable |
| Durability | Decades if waterproofed properly | 5 to 15 years typical for acrylic shells |
| Resale value | None for the tub; may add property value | Can be sold with the unit |
| Aesthetics | Custom finish, tile, plaster | Manufacturer design |
For most people who are serious about daily cold therapy and have a permanent home, a concrete plunge built correctly is likely the better long-term value. For people renting, moving in the next few years, or uncertain whether cold therapy will stick as a habit, a commercial unit (or even just an ice bath setup to start) makes more financial sense.
SweatDecks carries commercial cold plunge units if you want to compare specs and pricing against what a DIY build would cost you in your situation. They're worth looking at even if you're leaning toward building, just to know what you're comparing against.
One honest note: commercial plunges from reputable brands come with chillers already matched to the tub volume, safety certifications, and support if something breaks. A DIY concrete plunge has none of that. If something fails, you fix it.
How do you keep the water clean and safe in a concrete cold plunge?
Cold water slows bacterial growth but does not eliminate it. A concrete tub with no sanitation system will develop biofilm within days of regular use.
The three practical sanitation approaches for a DIY concrete plunge:
1. Drain and refill regularly. If you're using the tub for solo plunges a few times a week, draining and refilling weekly is workable if your water bill allows it. No chemical management needed.
2. Ozone or UV system. An ozone generator or UV-C lamp inline with a circulation pump kills pathogens without harsh chemicals. Ozone systems for small spas and tubs cost $100 to $400. UV-C lamp systems run $150 to $500. These are the most common setups for DIY cold plunges with a chiller. They reduce but do not fully eliminate the need for occasional chemical treatment.
3. Low-level chlorine or bromine. A free chlorine residual of 1 to 3 ppm and pH of 7.2 to 7.6 is the standard range for pool and spa water as specified by the CDC for public pools (private residential pools follow the same chemistry). [10] Maintaining that residual in cold, still water is achievable with a floating chlorine dispenser and twice-weekly testing. Cold water actually makes chlorine slightly more stable than in a heated spa, so the demand is lower.
Don't rely on the cold temperature alone. The CDC has documented Legionella and other pathogens in water features maintained without sanitation. [10]
For context on how cold plunge recovery actually works and what temperatures produce meaningful physiological effects, the cold plunge benefits page summarizes the current research without overstating it.
Can you pair a concrete cold plunge with a sauna for contrast therapy?
Yes, and this is one of the best setups you can build at home. The protocol of alternating heat and cold, commonly called contrast therapy, is the reason many serious builders pour a concrete plunge at the same time they install or build a sauna.
A typical contrast session: 15 to 20 minutes in a sauna at 170 to 190°F, followed by 2 to 5 minutes of cold immersion at 50 to 59°F, repeated two to four rounds. Some protocols end with cold, some with heat. The research on which is optimal for recovery versus muscle adaptation is still messy; nobody has clean data on the ideal protocol for every goal. A 2021 review in the Journal of Science and Medicine in Sport reported that contrast therapy showed modest benefits for reducing muscle soreness and perceived fatigue, while also cautioning that excessive cold exposure post-exercise may blunt some anabolic signaling. [11]
For the built environment, placing the cold plunge within a few steps of the sauna is ideal. Proximity matters because you want to get from 190°F air to 50°F water in 30 seconds or less. A concrete cold plunge next to an outdoor sauna, both on a common deck or pad, is the classic backyard setup.
If you're also planning a sauna, read our guides on home sauna builds and outdoor sauna options to think through how the two structures can share a footprint and electrical service.
Frequently asked questions
How much does it cost to build a concrete cold plunge tub?
A basic concrete cold plunge tub costs $500 to $1,500 in materials for most first-time builders, depending on size and waterproofing system. Add a recirculating chiller and you add $400 to $900 more. The budget floor is around $280 if you already own tools and use ice for chilling. The ceiling climbs fast if you tile the interior or buy a new commercial chiller.
How long does it take to build a concrete cold plunge?
Physical labor takes two to three weekends. The unavoidable wait is concrete cure time: 28 days before you can waterproof, then another week to cure the membrane. Total elapsed time from pour to first plunge is five to six weeks. You cannot rush the cure without risking cracking and waterproofing failure.
What type of concrete mix is best for a cold plunge tub?
Use a 4,000 PSI concrete mix with a water-to-cement ratio of 0.45 or lower. That low ratio is the biggest factor in reducing porosity. Fiber-reinforced mixes add crack resistance and are worth the extra cost. Avoid adding extra water to make mixing easier; it weakens the concrete and creates the capillary pores that cause leaks.
Do I need rebar in a concrete cold plunge tub?
Yes. Concrete handles compression well but is weak in tension. Without rebar or welded wire mesh, thermal cycling and soil pressure will crack the walls within a few years. Use #3 or #4 rebar on 6- to 8-inch centers with at least 1.5 inches of concrete cover on all sides. Rebar chairs are the easiest way to maintain that cover.
What is the best waterproofing for a concrete cold plunge?
Crystalline waterproofing (Xypex, Penetron) is the most durable option because it penetrates and bonds to the concrete matrix rather than sitting on the surface. Cementitious flexible membranes like Laticrete Hydro Ban are a good second choice if you plan to tile. Epoxy pool paint works but needs recoating every three to five years and can peel if applied before the concrete is fully cured.
How cold should a cold plunge tub be?
The temperature range supported by most cold water immersion research is 50 to 59°F (10 to 15°C). Going colder than 50°F increases the physiological stimulus but also the risk of cold shock and peripheral vasoconstriction causing injury. Most practitioners start at 55 to 60°F and work down over weeks. Staying in the 50 to 59°F range for 10 to 15 minutes is where most study protocols operate.
Do I need a permit to build a concrete cold plunge?
Likely yes for an in-ground build. Most U.S. jurisdictions follow codes that treat in-ground water structures over 18 to 24 inches deep as spas or pools, which require permits and may require a safety barrier. Above-ground builds get different treatment in some areas. Call your local building department before digging. A basic spa permit typically costs $100 to $300.
Can a concrete cold plunge go on a wood deck?
Only if the deck is engineered for it. A concrete cold plunge tub filled with water can weigh 2,500 to 3,000 pounds total. Standard residential decks are designed for 40 to 60 pounds per square foot live load. That concentrated weight will fail a typical deck. Build on a concrete pad or have a structural engineer verify your deck framing before you proceed.
How do I keep the water in a DIY concrete cold plunge clean?
The most practical options are draining and refilling weekly for solo use, running an inline ozone or UV-C sanitizer with a recirculating pump, or maintaining 1 to 3 ppm free chlorine with a floating dispenser. Cold water slows but does not stop bacterial growth. Do not rely on cold temperature alone for sanitation. Test pH and sanitizer levels at least twice a week if you are using chemicals.
How do I chill my DIY concrete cold plunge tub without buying a chiller?
Ice is the simplest starting point. A 120 to 150-gallon tub needs roughly 30 to 40 pounds of ice to drop temperature by 10°F, costing $3 to $8 per session at retail ice prices. A used chest freezer run as a heat exchanger with a submersible pump is a cheaper long-term option than buying a dedicated chiller. Most daily users eventually buy a recirculating chiller at $400 to $900 for the convenience.
How deep should a concrete cold plunge tub be?
A minimum interior depth of 36 inches lets most adults sit on a ledge at 18 inches and be immersed to the collarbone. Shallower than 30 inches limits you to leg and lower-body immersion, which reduces the full-body cold response. A seat ledge built into the pour at 18 inches gives you two immersion levels in one tub.
What is the difference between a concrete cold plunge and a stock tank or commercial unit?
Concrete is permanent, fully customizable, and durable for decades if waterproofed well. A galvanized stock tank costs $150 to $500, sets up in an afternoon, and can be moved, but it corrodes and has no seat or drain. Commercial cold plunges ($1,500 to $8,000) come with integrated chillers, filtration, and safety certifications. Concrete is the highest-effort, longest-lasting, lowest long-term cost option.
Can you use a concrete cold plunge for contrast therapy with a sauna?
Yes. Alternating sauna heat at 170 to 190°F with cold immersion at 50 to 59°F is a common contrast therapy protocol. Place the plunge within a few steps of the sauna so transitions take under 30 seconds. Research shows modest benefits for perceived soreness and fatigue recovery, though the optimal number of rounds and sequence (end hot or cold) is still debated in the literature.
Sources
- Portland Cement Association, Concrete Basics: 4,000 PSI concrete mix specifications, water-to-cement ratio guidance, and 28-day cure to reach full design strength
- International Code Council, International Swimming Pool and Spa Code (ISPSC): Definition of spa and pool for permitting purposes; in-ground water structures treated as pools under model codes
- Laticrete International, Crystalline Waterproofing Technology: Crystalline waterproofing reaction becomes permanent and integral to the concrete matrix, filling capillary pores
- American Concrete Institute, ACI 309R Guide for Consolidation of Concrete: Use of internal vibration to consolidate concrete in narrow form cavities and eliminate voids
- Rust-Oleum, EpoxyShield Pool and Deck Paint product guidance: Epoxy pool paint application requirements including full concrete cure before coating; recoating interval
- U.S. Bureau of Labor Statistics, Consumer Expenditures data: Retail ice pricing context supporting $2 to $4 per 20-pound bag range
- Machado AF et al., PLOS ONE 2022, 'What is the optimum temperature for cryotherapy?': Most cold water immersion studies used temperatures of 10 to 15°C (50 to 59°F) for durations of 10 to 15 minutes
- American Wood Council, Residential Deck Design Guide: Standard residential decks designed for 40 to 60 PSF live load; concentrated heavy loads require engineering review
- U.S. Consumer Product Safety Commission, Safety Barrier Guidelines for Residential Pools: Recommended 48-inch minimum fence height with self-latching gates around residential in-ground pool and spa structures
- Centers for Disease Control and Prevention, Healthy Swimming: Pool Chemical Safety: Free chlorine residual of 1 to 3 ppm and pH 7.2 to 7.6 recommended for pool and spa water safety
- Higgins TR et al., Journal of Science and Medicine in Sport 2021, 'Comparison of hydrotherapy and dry-land contrast therapy': Contrast therapy showed modest benefits for muscle soreness and fatigue; excessive cold post-exercise may blunt anabolic signaling

Share:
Stainless steel cold plunge tub gauge thickness: what you actually need
Polyethylene cold plunge tub UV degradation: what actually happens